
- 22日10月2020年
Ghost of Tsushima Legends Single Player | 52-year-old player’s strategy!
Ghost of Tsushima is a strateg……
Dying Light | Staffed Turtle |
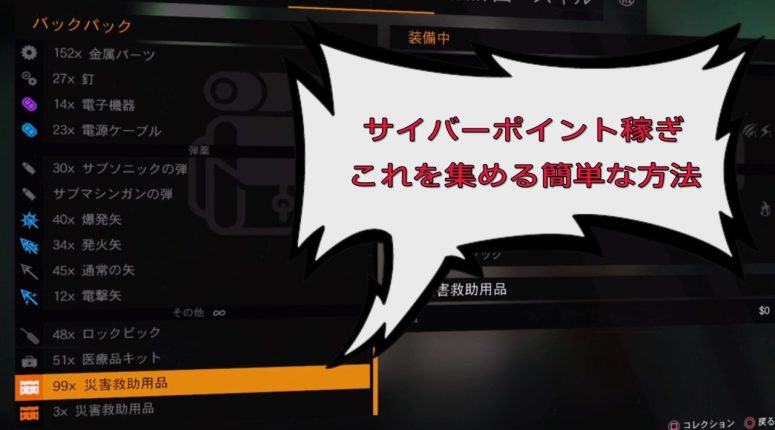
Survivor Point Earning (hereinafter referred to as SP Earning) has been introduced in various ways, but most of the contents are to collect disaster relief supplies and deliver them to the supplies section. As a result of my own research and practice, the challenge “Stuffed Turtle” was the safest to go around, so I would like to introduce it.

Earn survivor points and raise your survivor rank!
It’s important because as the survivor rank goes up, useful abilities are unlocked!


There are three types of Dying Light quests: Main Quest, Side Quest, and Challenge. Stuffed turtle belongs to a category called challenge and is generated by discovering a specific place.
And the challenge can be played over and over again.

【目次】
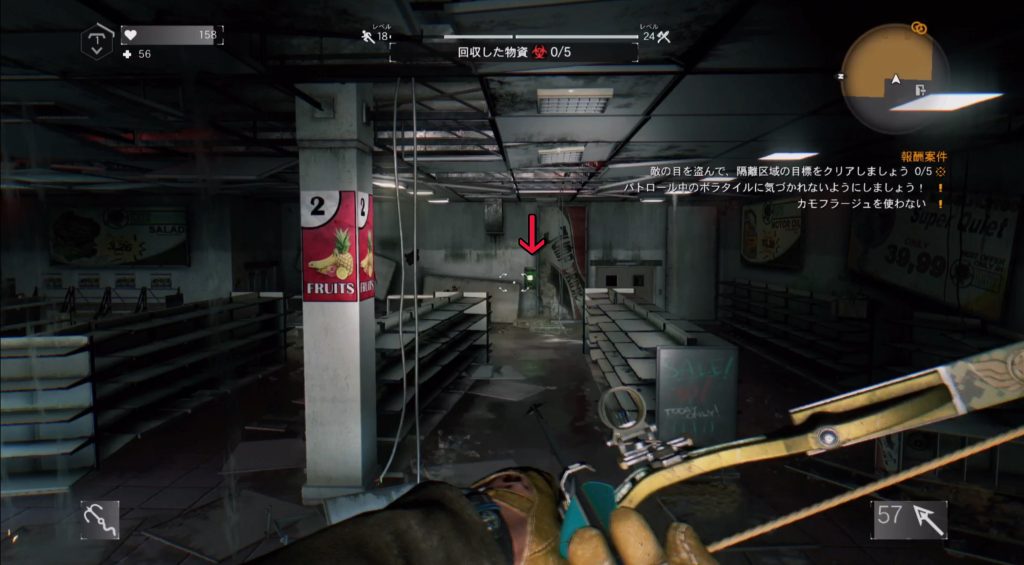
The location is northwest of the tower, almost on the edge of the slums. The site is an abandoned food supermarket, and the “Stuffed Turtle” will be released as soon as the entrance is discovered.
We recommend that you have at least a bow and arrow ready as you proceed with this challenge. If you are going around for the purpose of earning SP, you can get a time saving effect if you have a “hook” that you can get at survivor rank 12.


The stuffed turtle, which is relatively easy in recovery-type challenges, and the volatile during patrol displayed on the right side of the screen will not appear.
In order to clear this challenge, I will explain my own precautions and procedures. There are three rooms to explore, and there are things to be aware of for each.

First, go inside from the entrance and go up the wall on the right side to reach the first room. The floor of this room is almost entirely in a high voltage state. If you go down suddenly, you will be invited to death enough with one deep breath.
The highest priority is to switch off the switchboard that can be seen in the front. “Hook” is very useful here, but if you haven’t obtained it yet, cross the board on the right side and jump to the shelf while checking the scaffolding.
When using the hook, it often gets caught in an obstacle such as the left pillar and falls. As a countermeasure, by tilting the L stick to the right during hook flight, the course will be slightly to the right.

There is a wooden pallet in front of the switchboard, so if you turn off the jump switch, it will turn into a safe floor.

There are a total of three disaster relief supplies, one on the left front, one on the right cashier counter, and one on the rightmost shelf, facing backwards from the switchboard.

If you want to complete the challenge itself, you have to go to the back room. The sight seen from the peephole is horrifyingly wandering around with many zombies.
The door is locked and needs to be unlocked by picking. Rest assured that you will not be able to break through just by unlocking.


Immediately after opening the door, I go up to the shelf behind me and wait for the zombies to approach. If you have a bow, you can attack from the top of the shelf.

If you have mastered the skill Stomp, you will see a “Stab the End” button as the zombie approaches. The work of crushing the heads of zombies approaching one after another is a moment when you feel comfortable.

There are many things to be aware of in the section in front of the second room. Here, I will explain what to do on the way to the second room.
If you go too far from the door, a viral will appear, so be careful from the front. First, attract the biters remaining inside near the door and dispose of them.


If you proceed without noticing it, there is one bomber that makes you experience a dying state. Let’s handle it with a long-range weapon.

Depending on the position, viral may appear even while processing the bomber. The place where the viral appears is from under the block plate. Let’s decide the Stump, kick and hit the place that comes out in front.


If you can eliminate the viral, you can think that the safety is almost secured. Collect one disaster relief item from the second room.

Overcome the board that blocks the entrance and move to the third room. It’s finally time to collect the last disaster relief supplies.

If you look inside from the top of the board, you can see the disaster relief supplies. The fallen biter will attack because it is not rotten. Let’s get rid of it as soon as possible.
If you collect the last disaster relief equipment, you will clear the challenge.


It is a method to collect the three disaster relief supplies in the first room, and when you return to the entrance, go outside and restart. It is a method that takes advantage of the fact that the collected disaster relief supplies are not lost even if the challenge is not cleared.
You can understand it by watching the video.
Many senior players have introduced various methods, but as you can see from the video, this method was the most stable and easy. If you are looking for SP earning, why not try this method once?


Thank you for browsing.
Born in 1967, just an ordinary person who likes games. A blog I started as a hobby after retirement. We mainly take up Playstation and PC games, and post real-life experiences and petite strategies. From 2023, we are working to focus a little more on YouTube. Please drop in with the intention of killing time.
Ghost of Tsushima is a strateg……
Dark Soul Demon’s Soul I……
Demon’s Soul Remake | Fl……
Assassin’s Creed Valhall……
Longbow Ghost of Tsushima Are ……


![Ghost of Tsushima [Get a longbow] | Lore mission | Uchitune’s curse](https://senryokugaigame.com/wp-content/uploads/2020/07/playstationc2ae4__11-6-scaled.jpg)